Thursday, August 09, 2007

OMG! I made a sink!

So I had this wild idea the other day... I am working with an architect here in Seattle on finishing my attic and one of the finishes I needed to choose was a sink for a new bathroom. After looking at some sinks and considering all the glass/metal/porcelain options... I thought, "I could probably do that." The last set of pots that I did had a really nice aquatic looking interior with a nicely repeatable set of glaze steps so I decided to try my hand at making a sink.


I first threw a nice tall (but mostly cylindrical) pot out of 14 lbs of Dove porcelain. There was not so much grog in that stuff so I had a hard time with it wanting to flop over at the rim... so I figured that I would try again with a denser clay.

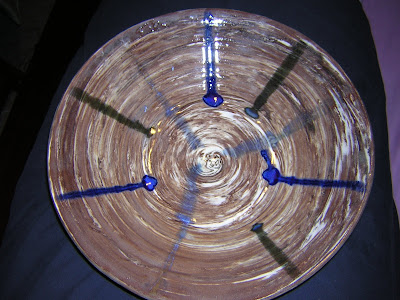
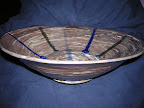
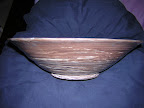
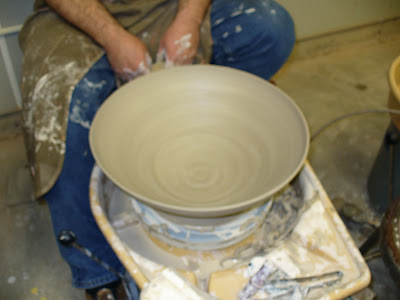
I switched to 16 lbs of CKK6 (with grog) and after a marathon of centering, I pulled up a nice tall cylinder about as tall as it was wide (maybe 10" at the base?) Then I used a nice tall rib to compress and normalize the walls. Then (using an 10" board as a stupidly long rib) I gently leaned the walls out to create the bowl shape. In a week or so when it gets 'leather' hard I will trim out a drain and carve a nice looking foot to hide the pipe.

This is by far the largest thing I have ever thrown and with a little luck, it will survive the trim and make it to the kiln without getting too screwed up. I don't know... it's a pretty full class at the community center this term any anything can happen in the next two weeks. Wish me luck!

Monday, August 06, 2007

A collection of Vashon orange pots that came out great!

These 3 came out awesome. I am loving Molasses as a base color with vibrant highlights and a mottled glaze for texture. The first thing my pottery teacher said when I came in to pick these guys up was: "Can I take a photo of those?" I couldn't be happier with how they turned out. These 3 came out so good that I am considering making a sink (we're remodeling our house) and I want to glaze that sink in the fashion of these pots.


Carved Vashon orange vessel with blue green treament.

This is the final in the set of things I treated in the same fashion... as I said in the last posts...

This pot was coated on the interior with sapphire blue terra siglata. Then the rim was coated with molasses brown and the exterior was layered with tx-1 texturizer, milky brown, blue mottled, denim blue, light blue and speckled ivory. The interior has tx-2 texturizer and chrome green and green mottled. Karen carved the rim.


Carved Vashon orange vessel with blue green treament.

Karen and I gave this pot to our friends Nick and Allison as a wedding present. It seemed appropriate since Karen and I both worked on this piece and since they had their reception like 10 blocks from our house, why not have a piece made in the neighborhood?

This pot was coated on the interior with sapphire blue terra sigillata. Then the rim was coated with molasses brown and the exterior was layered with tx-1 texturizer, milky brown, blue mottled, denim blue, light blue and speckled ivory. The interior has tx-2 texturizer and chrome green and green mottled. Karen carved the squiggly line on the rim and on the waist with a small ball-point burnisher after the piece was dry but before it was fired.

I really like how the carving and the texturizer hold on to the mottling and give a feel of flowing liquid to the outer part of the piece. I also like the darkly aquatic finish on the inside... The inside is not sealed up past maybe 3 inches so, one probably shouldn't fill it to far with liquid but it would make a nice vessel for dry goods, kitchen tools, loose change, chopsticks or dried flowers... The list is endless... Like all hand crafted pottery, it could go in to the oven but thermal shock should be avoided by never putting it in to a hot oven (instead place it in a cold oven and then raise the temperature.) The finishes are all food safe but the geometry of the piece doesn't really lend itself to food service.


Ovoid Vashon orange pot with blue green treatment

This pot was coated on the interior with sapphire blue terra siglata (a paint made of fine clay and colored oxides.) Then the rim was coated with molasses brown and the exterior was layered with tx-1 texturizer, milky brown, blue mottled, denim blue, light blue and speckled ivory. The interior has tx-2 texturizer and chrome green and green mottled.


Cracked black bowl with blue green treatment.

This black clay bowl S-cracked but it was so nice that I glazed it anyway. I used tx-1 texturizer and blue mottled, light blue and molasses glazes. The crack makes it a good flower pot if I can make a plate to go under it.


Blue and green klamath buff plate.

Sadly this plate came out at little wobbly and got worse in the high fire. It's going on my wall I think.

Wednesday, August 01, 2007

My Second teapot, this time more awesomely

This is my second teapot that looks WAY less crappy than my first. In fact the one harsh criticism I have of this one is that I broke the spout because it got too hard before I trimmed it. Other than also having a slight dribbling problem, I think I did good.


My first teapot!

In all honesty it's a crappy little pot that is nowhere near as cool as the teapots I flubbed earlier... However, this one has a lid that fits, a handle and a spout that mostly doesn't dribble down the front. Sure it looks like an 8 year old spray painted it a little too thick after making it from cat litter but still... It's my first teapot.

Tuesday, July 31, 2007

Blue cabochon set in sterling silver pendant.

Oh my god, the picture does no justice to the awesomeness of this piece! I have been taking a jewelry class for the last 6 weeks and after learning soldering, cutting, polishing, and a ton of other techniques, I finally made something that blows my mind.
This piece used to be a rock and some sheet silver and a thin flat silver wire. I wrapped the wire around the stone to make a collar and then soldered it together and to the silver plate... then I cut out the plate to match the collar and added a bail that I cut from a small strip of the silver sheet. I filed and polished it for several hours and then set the stone by working the edge of the wire just over the curve of the stone. I don't think I have ever made anything so beautiful.


Side on:

A raku blob reminicient of a shiny metallic crap.

This was my first Raku piece that was fired during a community raku event (sadly the last of its kind here.) Whereas mostly the peices came out shiny and metallic, mine came out looking like a lava rock in the shape of a deuce. I like some of the metallic highlights and the "organic" geometry is interesing but it looks like a bronzed growler.

Red clay pot with carving, shadow green and blue ribbon.

This was yet another teapot that I created before I learned that you make your pot and your lid at the same time and then you don't let them dry out before thinking about a spout and a handle... These are a good start though. I threw and glazed the piece and Karen carved the squiggle... I should probably have her carve everything since it traps the highlights of the glaze so nicely!

Agateware bowl with clear gloss and blue ribbons

This is another would be teapot from when I was trying to teach myself how to make a teapot. Sadly, this one turned out super well except that I didn't know how to make a spout, lid or handle.

Agateware bowl with clear gloss and blue ribbons

This was originally going to be a teapot but I let it get to hard before attaching a spout, lid or handle... So now it's bowl with a lid gallery.


Monday, April 02, 2007

Asymmetrical fused silver ring with a ruby.


This ring was formed by fusing a 10 gauge silver wire ring at about a ring size of 8. Then I built of the table of the ring with additional pieces of 14 gauge silver. After fusing, I shaped the ring with a hammer and mandril to expand the ring diameter to size 11. I then trimmed the table with a dremel and drilled the gem setting. After running the ring through a steel-shot tumbler, I polished it and set the gem with some jewelers resin.

Fine silver fused ring with inset ruby.


WOW! I totally learned how to set a gem in the rings I have been fusing out of silver. This is actually a ring that I made a few weeks ago from two pieces of 10 gauge silver formed in to rings and then fuzed together. I hammered and polished this ring a wore it for a week until I got the courage to drill a setting and place a ruby in it. I got my gems from a PMC supply house and I selected them for thier colorfastness during firing... Ironically, my original plan involved soldering a bezel wire to this band and then crimping in the gem... Instead, I ended up affixing the gem with jewelers resin.