Monday, April 02, 2007

Asymmetrical fused silver ring with a ruby.


This ring was formed by fusing a 10 gauge silver wire ring at about a ring size of 8. Then I built of the table of the ring with additional pieces of 14 gauge silver. After fusing, I shaped the ring with a hammer and mandril to expand the ring diameter to size 11. I then trimmed the table with a dremel and drilled the gem setting. After running the ring through a steel-shot tumbler, I polished it and set the gem with some jewelers resin.

Fine silver fused ring with inset ruby.


WOW! I totally learned how to set a gem in the rings I have been fusing out of silver. This is actually a ring that I made a few weeks ago from two pieces of 10 gauge silver formed in to rings and then fuzed together. I hammered and polished this ring a wore it for a week until I got the courage to drill a setting and place a ruby in it. I got my gems from a PMC supply house and I selected them for thier colorfastness during firing... Ironically, my original plan involved soldering a bezel wire to this band and then crimping in the gem... Instead, I ended up affixing the gem with jewelers resin.

Tuesday, March 13, 2007

Wire wrapped briolette pendant


I wrapped copper wire through this briolette of pinapple quartz and attached it to a black leather cord.

Wire wrapped copper rings with beads


I made these rings by wrapping thick copper wire around a knitting needle and then wrapping thin wire to secure some beads.

Some lampworked glass beads and a fused silver ring.


I made these beads by melting colored glass rods with a mapp gas torch and twisting the molten glass around a coated metal mandrel. I made the ring by wrapping fine silver wire around a big knitting needle (the same size as my ring finger) and then fusing the wire in to one contiguous ring with a butane torch. To harden the ring I beat it with the ball end of a ball-peen hammer against a steel block.

Monday, March 12, 2007

New retaining wall and flower bed for spring.

This first photo is through my rainy window looking out over my new flower bed. The pineapple express brought a warm drizzle from hawaii that pleasantly soaked my new plants... The only downside was some high winds. The second photo is along my street, you can see one of my Hellebores knocked down by the wind... it's up on stakes now.


This next pair of photos are of the view looking at my house and along my side street. You can see that the retaining wall isn't all that (but it's not bearing a load so much as edging the lawn and keeping the two zones from intruding on each other. I also put some soil down in to a low spot on my lawn that I may have to reseed if the grass doesn't push through. My next big yard project (aside from trying to compost the blocks of sod I cut out) is to rebuild the trellis in front using taller 4x4 posts anchored to the concrete.

Tuesday, March 06, 2007

Here's one of my mugs in action!

My friend Sebastian (aka Sebadiah) is a big fan of yerba matte so I made him a mug and this is a sequence of shots of his matte setup. Note the awesome silver filter straw.

From Craft Photos


From Craft Photos


From Craft Photos


From Craft Photos

Saturday, February 10, 2007

Striped seamless raglan pullover with cables and epaulettes

From Craft Photos


Wow, this sweater took me forever! I started it this last June and I just finished it at my company's holiday ski party this February. This is the first really large object with a cable I have done and this is the 3rd time I have made the Elizabeth Zimmerman Knitting Without Tears raglan pullover sweater. Features include:
1. 1x1 ribbed waistband, cuffs and neck.
2. 1x1 ribbed sidepanels that decrease to the armpits.
3. 4 cables of predominantly p2,k2,p1,k2,p2 repeat pattern with both crossover and "S" cabling.

Klamath yellow mugs with ultramarine and saturation metallic.


This is a set of mugs I made from Klamath yellow scraps I had left over from previous projects. (Most of which died horrible deaths or abominable undeaths.) You will ocassionally see white horizontal agate effects that are white porcelain that were just incidentally part of the scraps. I love these mugs. I am getting to the point where I can make a really pleasing mug 3 times out of 5. I am still having trouble making handles symmetrically but I love the product. I think if I try really really hard, I can make 10 each term and have enough for christmas/anniversary/Christmas presents all year. I love each and everyone of these silly little mugs!

Morgans fruitbowl #3 with ultramarine drizzles and rutile blue crazing

This large fruitbowl is the 3rd in a series of 3 Morgans clay bowls that I dressed simply to emphasize the natural warmth of the clay. In addition to the clear semigloss and ultramarine drizzles, I added rutile blue to the outer surface that crazed and crackled with the semigloss.

Morgans fruitbowl #2 with ultramarine drizzles


Again with the Morgans, semi-gloss clear and ultramarine drizzles. This is dressed with ultramarine droplets on the outer surface.

Morgans fruitbowl with ultramarine drizzles


This is part of a set of pieces I did with Morgans clay (a light brown with flecks of black.) I was particularly pleased with the throwing consistency and amount of grogg. Maybe I got lucky but I got some good pieces out of this loaf of clay.

This piece is glazed with a simple semigloss clear and drizzled with ultramarine blue and I think rutile blue.

Tuesday, January 30, 2007

Pixie bix on my awesome 2nd sweater.


This is my wee pixie bix (beeks.) She loves knitted garments and is imho terribly photogenic. She is also the sweetest kitty evar! Oh yeah, there's a black cotton sweater with brown highlights ala Elizabeth Zimmerman's Knitting Without Tears.

Zimmerman has a really well adjusted approach to knitting patterns that is designed to allow the knitter to customize any pattern to their own particular desires. Instead of giving you numbers of stitches to cast on for every gauge, she tells you to measure your body and knit a gauge swatch and then do the math. I have made 3 sweaters based on her seamless raglan sweater and I have added my own decorative and functional accents with each one. I highly recommend this book for people who hate following line by line instructions.

All seasons cotton sweater with khaki highlight and ribbed side panels


I made this neck down pulloever with all seasons cotton. The side panels are my attempt to shape the garment but mostly in drapes on me like a tent. The left arm is bound off a little tight but on the whole, it's a very comfortable sweater.

Top down is an interesting method but I did not enjoy it as much as bottom up. I didn't like picking up the neck nor did I like the shape of the arm decreases or raglan increases. I like my raglans more overt and the backwards loop increases I uses were just to hard to see! I got this Knitting Pure and Simple pattern and the Rowan All Seasons Cotton from Hilltop Yarn on Queen Anne hill in Seattle.

Kureyon cable hat with minty flax liner.

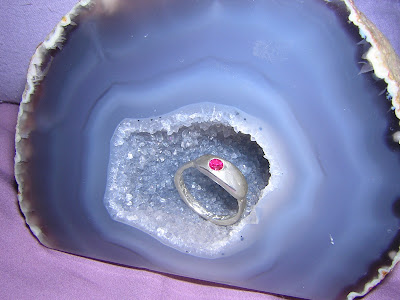
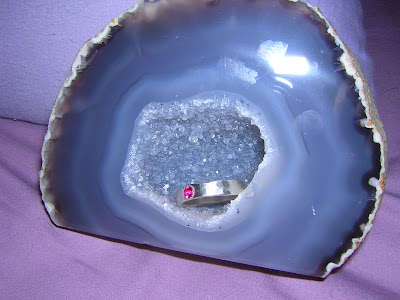
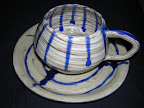
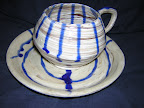
This is Karen in a cap I made for her out of Kureyon and a minty flaxen liner. I started the liner in the round and then switched to Kureyon after about 4 inches and then I folded the liner in and knitted it together with the outershell in a 4 inch headband and then I finshed the cap. The pattern is a 3 knit-purl-1x1-cable-purl.
the 1x1 cable twists every other round I think.
Howard Phillip is shown in the background.

I don't really have a hat pattern so much as an idea about how this kind of hat in the round works. The basic idea is that you start with headband that is calculated to fit from a measurement and a gauge swatch. The common wisdom length of the headband portion is 6" for a woman and 7" for a man. I think you can measure the distance from from the ridge of your eyebrows to the center top of your head and subtract 2" (for the decreases.) My head is 22" around and my flat stockinette gauge for this was 4.5 stiches to the inch. So I needed something in the area of 99 stitches.

It is a good idea to add ribs for extra stretchiness on the headband but you have to slightly alter your math to accomodate them. Ribs are vertical columns of alternating groups of knit and purls (k2p2 is a particularly good one.)

So having decided to do about 99 stiches... then it's time for the decrease math... Without ribs, choose a multiple of 7 that is near the target number. (Since 14*7 = 98 and 99 is our target, 98 is a good number of stiches to cast on.) I decrease by transfering to 4 double-pointed needles and then alternating decreasing rows and flat rows. The decreases also escalates in frequency in the following row pattern... (K2tog means knit two stiches together. )
1: (K5 K2tog)* This takes 7 stiches and decreases the last two to leave 6 stiches... 98 -> 84
2: flat
3: (k4 k2tog)* this takes every 6 to 5... 84 -> 70
4: flat
5: (k3 k2tog)* 5->4.. 70 -> 56
6: flat
7: (k2 k2tog)* 4->3.. 56->42
8: flat
9: (k1 k2tog)* 3->2.. 42->28
10: flat
11: (k2tog)* 2->1.. 28->14
12: repeat 11 until number of stitches is somewhere between 6 and 12. (2->1 again.. 14->7)

Ok so we went from 98(14*7) to 14 (14*1) over the course of 12 or so rows (2.5 inches or so) and then finished off with a decrease to leave us with a small number of stiches (7 finally.) Then using the remaining yarn tail (say about a foot) loop the tail through the 7 stiches and cinch them up in a loop and tightly weave in the tail (or tie it off if you prefer.)

Ribs can make a hat more functional and attractive but require slightly different math. A rib is a repeated vertically aligned knit-purl pattern like k2 p2 that makes vertical columns in yor knitting and has a footprint that is the number of stitches in the repeat. In k2p2, the pattern has a 4 stitch footprint and so to make the pattern lineup in the round you need to ensure that when you choose a multiple of 7 for decreasing, you also need to choose a multiple of 4. Since 7 and 4 are relatively prime, you have to choose a mulitple of 7*4 = 28 for the math to work out. Sadly the nearest multiple of 28 to 99 is 112 (28*4.) This is 13 stiches (almost 3 inches over the target value of 99.) Fortunately you can count on the ribs being a little more stretchy to accomodate 10%-20% depending on the rib pattern. This means that if the target is 22" we have 2"-4" of additional size allowed by the stretchiness of the rib. However, if we wanted to hit the target, we could instead of choosing 7, choose six as our magic decrese starting number, do the math and then start the decrease pattern at step 3. Also, note that since 6 and 4 are not relatively prime, instead of having to find multiples of 24 (6*4), you can look for multiples of 12.

Write me a comment if you have any questions.