Saturday, February 10, 2007

Striped seamless raglan pullover with cables and epaulettes

From Craft Photos


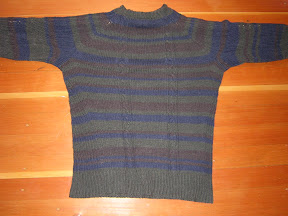
Wow, this sweater took me forever! I started it this last June and I just finished it at my company's holiday ski party this February. This is the first really large object with a cable I have done and this is the 3rd time I have made the Elizabeth Zimmerman Knitting Without Tears raglan pullover sweater. Features include:
1. 1x1 ribbed waistband, cuffs and neck.
2. 1x1 ribbed sidepanels that decrease to the armpits.
3. 4 cables of predominantly p2,k2,p1,k2,p2 repeat pattern with both crossover and "S" cabling.

Klamath yellow mugs with ultramarine and saturation metallic.


This is a set of mugs I made from Klamath yellow scraps I had left over from previous projects. (Most of which died horrible deaths or abominable undeaths.) You will ocassionally see white horizontal agate effects that are white porcelain that were just incidentally part of the scraps. I love these mugs. I am getting to the point where I can make a really pleasing mug 3 times out of 5. I am still having trouble making handles symmetrically but I love the product. I think if I try really really hard, I can make 10 each term and have enough for christmas/anniversary/Christmas presents all year. I love each and everyone of these silly little mugs!

Morgans fruitbowl #3 with ultramarine drizzles and rutile blue crazing

This large fruitbowl is the 3rd in a series of 3 Morgans clay bowls that I dressed simply to emphasize the natural warmth of the clay. In addition to the clear semigloss and ultramarine drizzles, I added rutile blue to the outer surface that crazed and crackled with the semigloss.

Morgans fruitbowl #2 with ultramarine drizzles


Again with the Morgans, semi-gloss clear and ultramarine drizzles. This is dressed with ultramarine droplets on the outer surface.

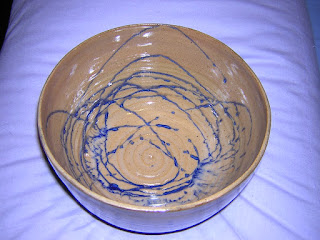
Morgans fruitbowl with ultramarine drizzles


This is part of a set of pieces I did with Morgans clay (a light brown with flecks of black.) I was particularly pleased with the throwing consistency and amount of grogg. Maybe I got lucky but I got some good pieces out of this loaf of clay.

This piece is glazed with a simple semigloss clear and drizzled with ultramarine blue and I think rutile blue.

Tuesday, January 30, 2007

Pixie bix on my awesome 2nd sweater.


This is my wee pixie bix (beeks.) She loves knitted garments and is imho terribly photogenic. She is also the sweetest kitty evar! Oh yeah, there's a black cotton sweater with brown highlights ala Elizabeth Zimmerman's Knitting Without Tears.

Zimmerman has a really well adjusted approach to knitting patterns that is designed to allow the knitter to customize any pattern to their own particular desires. Instead of giving you numbers of stitches to cast on for every gauge, she tells you to measure your body and knit a gauge swatch and then do the math. I have made 3 sweaters based on her seamless raglan sweater and I have added my own decorative and functional accents with each one. I highly recommend this book for people who hate following line by line instructions.

All seasons cotton sweater with khaki highlight and ribbed side panels


I made this neck down pulloever with all seasons cotton. The side panels are my attempt to shape the garment but mostly in drapes on me like a tent. The left arm is bound off a little tight but on the whole, it's a very comfortable sweater.

Top down is an interesting method but I did not enjoy it as much as bottom up. I didn't like picking up the neck nor did I like the shape of the arm decreases or raglan increases. I like my raglans more overt and the backwards loop increases I uses were just to hard to see! I got this Knitting Pure and Simple pattern and the Rowan All Seasons Cotton from Hilltop Yarn on Queen Anne hill in Seattle.

Kureyon cable hat with minty flax liner.

This is Karen in a cap I made for her out of Kureyon and a minty flaxen liner. I started the liner in the round and then switched to Kureyon after about 4 inches and then I folded the liner in and knitted it together with the outershell in a 4 inch headband and then I finshed the cap. The pattern is a 3 knit-purl-1x1-cable-purl.
the 1x1 cable twists every other round I think.
Howard Phillip is shown in the background.

I don't really have a hat pattern so much as an idea about how this kind of hat in the round works. The basic idea is that you start with headband that is calculated to fit from a measurement and a gauge swatch. The common wisdom length of the headband portion is 6" for a woman and 7" for a man. I think you can measure the distance from from the ridge of your eyebrows to the center top of your head and subtract 2" (for the decreases.) My head is 22" around and my flat stockinette gauge for this was 4.5 stiches to the inch. So I needed something in the area of 99 stitches.

It is a good idea to add ribs for extra stretchiness on the headband but you have to slightly alter your math to accomodate them. Ribs are vertical columns of alternating groups of knit and purls (k2p2 is a particularly good one.)

So having decided to do about 99 stiches... then it's time for the decrease math... Without ribs, choose a multiple of 7 that is near the target number. (Since 14*7 = 98 and 99 is our target, 98 is a good number of stiches to cast on.) I decrease by transfering to 4 double-pointed needles and then alternating decreasing rows and flat rows. The decreases also escalates in frequency in the following row pattern... (K2tog means knit two stiches together. )
1: (K5 K2tog)* This takes 7 stiches and decreases the last two to leave 6 stiches... 98 -> 84
2: flat
3: (k4 k2tog)* this takes every 6 to 5... 84 -> 70
4: flat
5: (k3 k2tog)* 5->4.. 70 -> 56
6: flat
7: (k2 k2tog)* 4->3.. 56->42
8: flat
9: (k1 k2tog)* 3->2.. 42->28
10: flat
11: (k2tog)* 2->1.. 28->14
12: repeat 11 until number of stitches is somewhere between 6 and 12. (2->1 again.. 14->7)

Ok so we went from 98(14*7) to 14 (14*1) over the course of 12 or so rows (2.5 inches or so) and then finished off with a decrease to leave us with a small number of stiches (7 finally.) Then using the remaining yarn tail (say about a foot) loop the tail through the 7 stiches and cinch them up in a loop and tightly weave in the tail (or tie it off if you prefer.)

Ribs can make a hat more functional and attractive but require slightly different math. A rib is a repeated vertically aligned knit-purl pattern like k2 p2 that makes vertical columns in yor knitting and has a footprint that is the number of stitches in the repeat. In k2p2, the pattern has a 4 stitch footprint and so to make the pattern lineup in the round you need to ensure that when you choose a multiple of 7 for decreasing, you also need to choose a multiple of 4. Since 7 and 4 are relatively prime, you have to choose a mulitple of 7*4 = 28 for the math to work out. Sadly the nearest multiple of 28 to 99 is 112 (28*4.) This is 13 stiches (almost 3 inches over the target value of 99.) Fortunately you can count on the ribs being a little more stretchy to accomodate 10%-20% depending on the rib pattern. This means that if the target is 22" we have 2"-4" of additional size allowed by the stretchiness of the rib. However, if we wanted to hit the target, we could instead of choosing 7, choose six as our magic decrese starting number, do the math and then start the decrease pattern at step 3. Also, note that since 6 and 4 are not relatively prime, instead of having to find multiples of 24 (6*4), you can look for multiples of 12.

Write me a comment if you have any questions.
A varigated hat with orange star cotton liner.


I knited this hat using double knitting to simultaneously craft the scratchy kureyon outer shell and soft cotton-elastic liner. Boo my naughty cat is shown in the background.

I double knitted this hat by casting on twice the number of liner yarn stiches as head measurement and a gauge calculation would suggest. Then I knitted every alternating stich in scratchy kureyon and I purled every other stich in liner yarn. If you do this right, without letting the yarns twist, you create two completely separate cloths that are joined at the rim. I twisted a couple of stiches so my shell and liner are bound togethera few times in addition to the rim. Executing the decreases without binding the two cloths is tricky!

Monday, January 29, 2007

Klamath yellow mug with temokku brown and various blue hightlights.

This mug was a salvaged mix of klamath yellow (which fires red) and white porcelain. I tried out my temokku brown, shadowgreen, ultramarine blue and blue rutile. I gave this one to Kyle my wacky friend from Mukilteo. Kyle was the office manager for my company's Fremont sattelite office and he recently left to chase a bigger paycheck. Dollah dollah bill y'all. Kyle, you will be missed.

Klamath yellow cup with saturation metallic and various blue highlights.


This mug is klamath yellow (a very soft yellow clay that fires red with large amounts of grog.) This mug features a dark hematite black glaze called saturation metallic that looks awesome. The highres version of this photo looks cool in the way it picks up the lavender highlights of the pillow upon which it's resting. I gave this one to Jason my new friend from Fremont.

Inward sloping wide porcelain vessel with blue mottling and brown texturizer

What do you call this shape? It has straight inward sloping sides and a wide base. This piece has some interesting glaze interplay on the surface .

Marine blue and brown flowing glazed urn shaped flower pot.

This flowing urn is a hollow bottomed (a tube really) planter with a drainage hole at the base.

Blooper reel: Klamath yellow and white porcelain agateware dish with shadow green.

Sadly the shadowgreen dominated the agateware effect. Next time I try agateware I will use a highgloss clear glaze instead.

Spherical porcelain flower pot with blue grey mottled and ultramarine highlights.

I made this piece specially for my friend Eddie and his critically ill bonsai. I hope this cheers the little plant up. It's one of my favorite pieces of all time. The white regions are unglazed (a requirement of the project) and there is a blue-grey rim with ultramarine drizzles.

Update: We have repotted his bonsai and it looks much happier. It still looks ill but it's a stylish, awesome sort of Ill.

Klamath yellow flower pot with shadowgreen and various blue glazes

This flower vase and plate combo is more klamath yellow with shadow green and various blues. The pot has a small drainage hole at the base and the whole object is about the size of a 12 oz coffee cup.

funnel shaped alpine bowl with blue terra-siglata splatter highlights for my brother Charles


This funnel shaped bowl was there the day my brother Charles popped by the studio and he said he liked the shape. It is white heavily grogged clay with a superficial blue clay spatter design. The glaze is shadowgreen with ultramarine blue drizzles.

Blue and white agateware bowl with shadow green


This bowl is the first thing I ever threw that was perfectly executed. It's a blue and white agateware piece that I made by adding blue (copper? cobalt?) oxide to white porcelain. I then dipped it in shadowgreen. I was hoping the shadow green would be a little less intense and show the agate more clearly but it gave the peice a really nice gloss and interesting almost aquatic colors.

Monday, January 08, 2007

Up for grabs glaze test on black

This is the last of the glaze tests I ran. This is medium sized black fruitbowl that I speckled with TX-1 texturizer. At the top is blue-grey mottled. At the bottom are small spots of pearlescent blue. Clockwise is a barely visible semigloss brown called temmokku. Finally, directly left is the electric blue. I love this bowl. I am considering drilling a hole in base and potting a very lucky plant in it.

Up for grabs glaze test 2


This is a second glaze test I tried with a rough white clay bowl. Top right is blue-grey mottled. The orange specks are TX-1 texturizer. At the bottom there is a pearlescent blue followed in clockwise order by the dark semigloss brown temmokku. Finally in the upper left is the electric blue.